MultiCoder in practice: fast and simple
Minitube recently launched the MultiCoder, a semi-automatic labeling device for culture dishes, centrifuge tubes, straws, and many other types of laboratory items. Direct printing on the container surface revolutionizes the labeling process in laboratories.
But what about everyday use - is the MultiCoder fast and user-friendly? Our answer is, "Absolutely!". By the example of a density gradient tube, we are going to illustrate the few steps that are required to print a laboratory vessel with brilliant clarity and maximum information content.
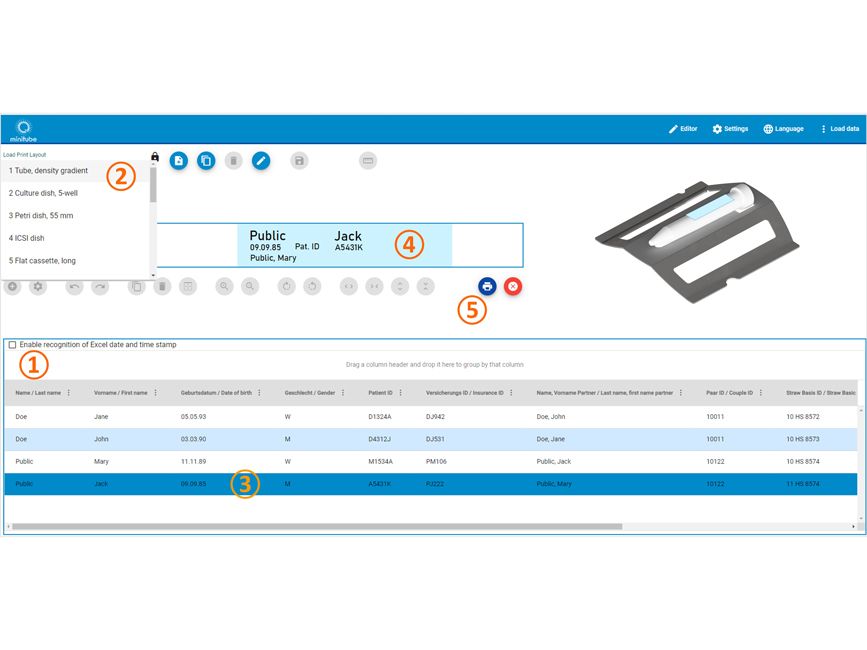
Each laboratory designs its individual print templates for the containers that are in use. The templates are only created once, saved, and can be protected against unintentional changes. You determine the print position, font size, font type and the type of data that is printed on the container. The selection of your individual templates will appear in a drop-down menu (2) of the printer software. We choose the density gradient tube - the software shows the corresponding product carrier.
The patient data for printing can be selected with just one mouse click by marking the corresponding data line (3) in the table. The corresponding print preview (4) will appear in the template. In our example, the density gradient tubes of all patients can be printed very quickly by clicking on the patient rows one after the other.
While reading through steps 1 to 3 of this text and looking at the corresponding images, you would in reality have executed the prints on all patients´ tubes. The MultiCoder turns labeling into an event – fast, easy and with no risk of data transfer errors.
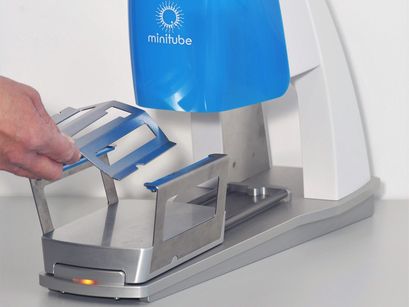
Image 1: Mounting the product carrier for 15 ml centrifuge tubes on the MultiCoder´s linear carriage
Image 2: Screenshot of the MultiCoder software; the orange numbers in circles refer to the text
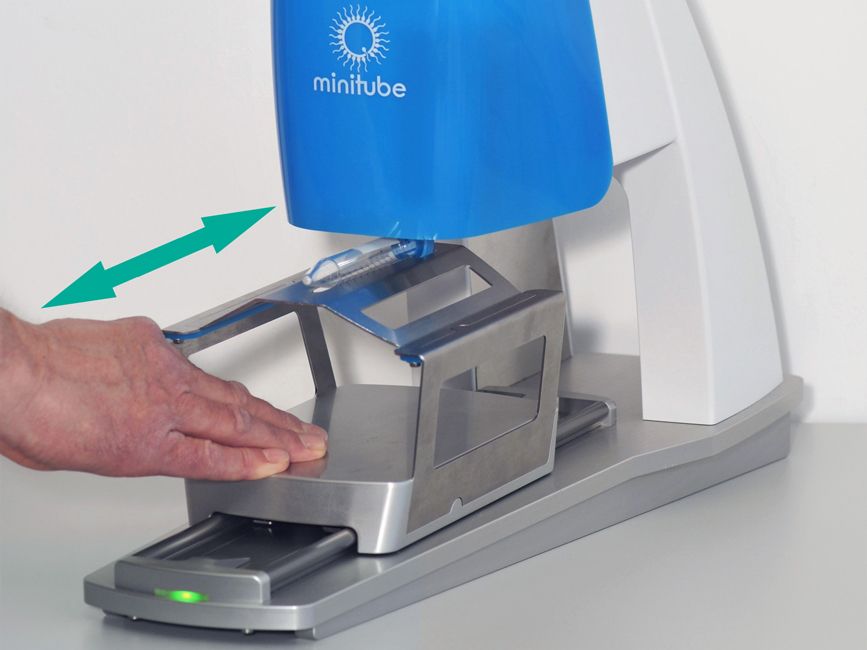
Image 3: Printing is performed by manually moving the linear carriage back and forth
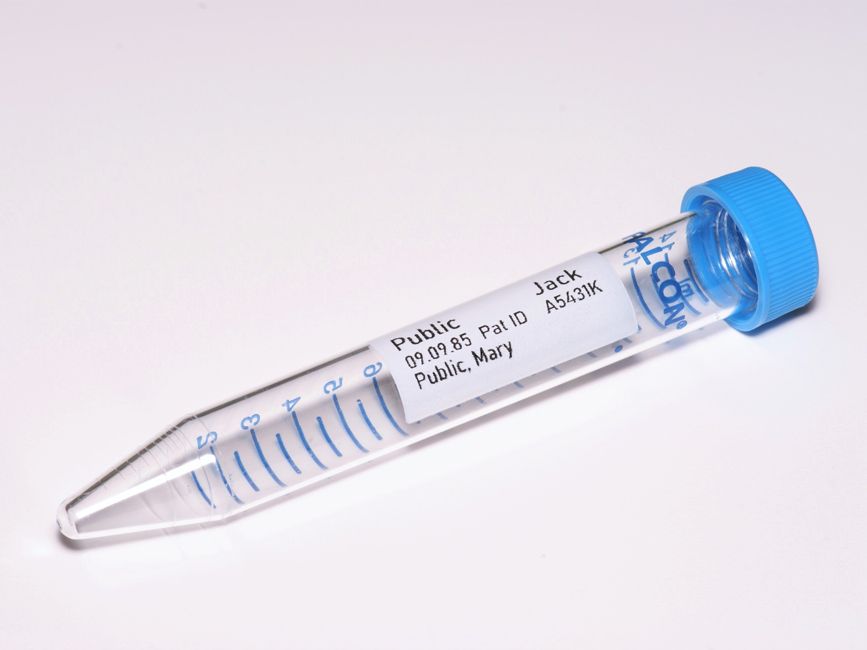
Image 4: A centrifuge tube labeled with the MultiCoder; note how much information can be applied to the labeling area
But what about everyday use - is the MultiCoder fast and user-friendly? Our answer is, "Absolutely!". By the example of a density gradient tube, we are going to illustrate the few steps that are required to print a laboratory vessel with brilliant clarity and maximum information content.
1. Hardware: mount and load the right product carrier (image 1)
For almost every type of laboratory vessel there is a special product carrier (= holder) available as an accessory to the MultiCoder. Various product carriers available as accessories enable you to convert the MultiCoder from a tube printer into a dish printer, into a straw printer etc. within seconds. They are magnetic and exchangeable without tools. We choose the product carrier for tubes (15 ml) and load it with the tube to print on.2. Software: select the print template and the patient data (image 2)
After opening the MultiCoder software, the “patients of the day” can be uploaded with just a few clicks. A table (1) clearly lists the patient data line by line. An Excel file can serve as the data source. Alternatively, the patient data can be conveniently sent from MedITEX (an ART management system) directly to the printer software.Each laboratory designs its individual print templates for the containers that are in use. The templates are only created once, saved, and can be protected against unintentional changes. You determine the print position, font size, font type and the type of data that is printed on the container. The selection of your individual templates will appear in a drop-down menu (2) of the printer software. We choose the density gradient tube - the software shows the corresponding product carrier.
The patient data for printing can be selected with just one mouse click by marking the corresponding data line (3) in the table. The corresponding print preview (4) will appear in the template. In our example, the density gradient tubes of all patients can be printed very quickly by clicking on the patient rows one after the other.
3. Execute the print (images 2, 3 and 4)
A mouse click on the “print” button (5) sends the print command to the MultiCoder. Now, all that remains is to move the linear carriage with the tube carrier and the tube on top under the print head by hand at any speed: the cryo-resistant, abrasion-resistant print is applied silently.While reading through steps 1 to 3 of this text and looking at the corresponding images, you would in reality have executed the prints on all patients´ tubes. The MultiCoder turns labeling into an event – fast, easy and with no risk of data transfer errors.
Image 1: Mounting the product carrier for 15 ml centrifuge tubes on the MultiCoder´s linear carriage
Image 2: Screenshot of the MultiCoder software; the orange numbers in circles refer to the text
Image 3: Printing is performed by manually moving the linear carriage back and forth
Image 4: A centrifuge tube labeled with the MultiCoder; note how much information can be applied to the labeling area